
JWT Authentication in Node.js Explained Simply
What Authentication Means
Authentication is the process by which an application determines whether a user is who they say they are. Whenever you log in to a website or use a secure feature in an app (such as viewing your messages, managing your account, or making a transaction), authentication ensures that you and only you can access your private data.
Without authentication:
Anyone could impersonate any user.
Private data, actions, and preferences could not be protected.
Most modern applications require some form of authentication on almost every user action after login.
Why Do We Need Authentication?
Web servers serve many clients at once and the HTTP protocol itself is "stateless," meaning the server does not automatically know if a request belongs to a logged-in user.
Authentication bridges this gap by letting the server recognize who is making each request—so it can allow or forbid actions based on identity.
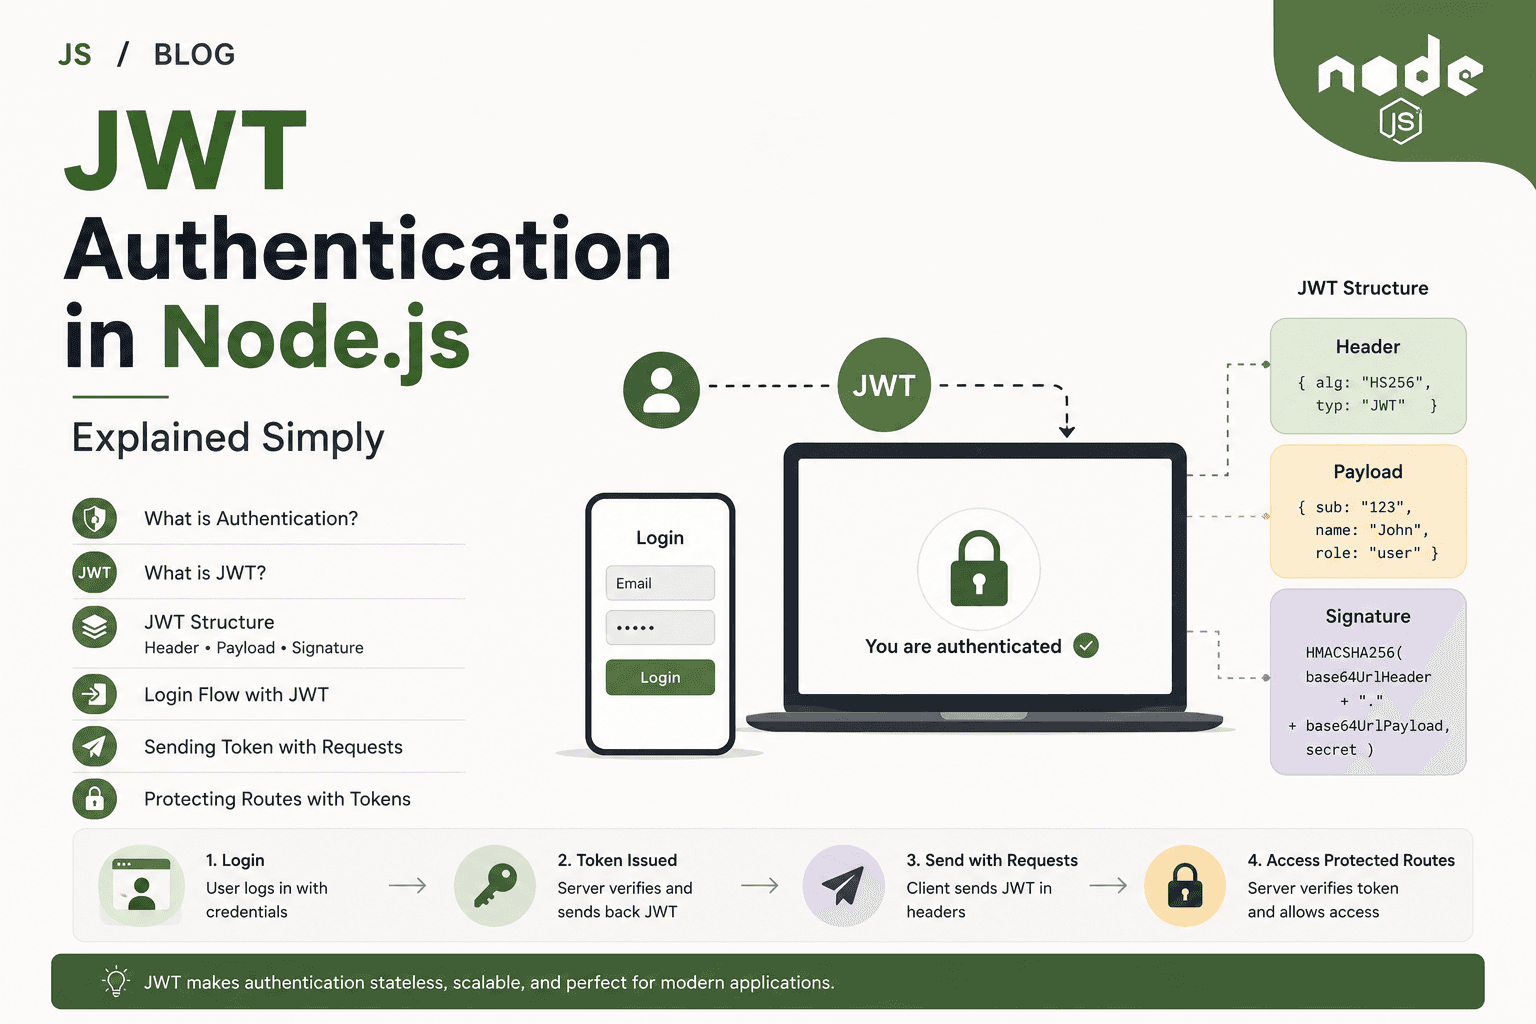
What Is JWT (JSON Web Token)?
A JWT (JSON Web Token) is a compact, self-contained, and digitally signed way of representing user identity and claims between a client and a server.
It is a long string, easy to store or send in a header or cookie.
It allows "stateless" authentication—the server does not need to keep a session record for each user.
It is commonly used in REST APIs, SPAs (Single Page Apps), and microservices.
Structure of a JWT: Header, Payload, Signature
A JWT consists of three parts, separated by dots (.):
eyJhbGciOiJIUzI1NiIsInR5cCI6IkpXVCJ9   .   eyJ1c2VySWQiOjEyMywiZW1haWwiOiJ1c2VyQGVtYWlsLmNvbSJ9   .   6qGFWrGUo4b7xGZ3QwlTg5KET5LOX6YtZAFoMFk0IKc
  (header, base64)                      .            (payload, base64)                     .              (signature)
1. Header
The header typically consists of:
The type of the token, which is JWT.
The signing algorithm being used, such as HS256 (HMAC SHA256).
Example (decoded):
{
  "alg": "HS256",
  "typ": "JWT"
}
2. Payload
The payload contains the "claims" — the information you want to transmit, such as user ID or role.
Example (decoded):
{
  "userId": 123,
  "email": "user@email.com",
  "role": "admin",
  "exp": 1712345678    // Expiry time (optional but recommended)
}
Important:
JWT payloads are just base64-encoded—they can be decoded by anyone.
Never store sensitive information (like passwords) in the payload.
3. Signature
The signature is generated by taking the header and payload, combining them, and cryptographically signing with a secret or private key owned by the server.
It ensures the data hasn't been tampered with.
When the client sends the JWT back, the server checks the signature before trusting any claims.
How JWT Authentication Works: Step-by-Step Login Flow
User Logs In:
The user sends their credentials (such as username and password) to a login API endpoint.Server Verifies Credentials:
If the username and password are correct, the server generates a JWT, signing it with a secret key.
The JWT includes data about the user (like user ID, email, or role), not the password.
Server Sends Token to Client:
The JWT is sent back to the client (browser, mobile app, etc.), usually in the response body or as a cookie.
The client stores the token (often in localStorage, sessionStorage, a cookie, or memory).
Client Sends Token on Each Request:
For any API requests that need authentication, the client attaches the JWT to the request—typically using the
AuthorizationHTTP header:Authorization: Bearer <jwt-token-here>
Server Verifies Token:
Every time a protected route is accessed, the server extracts the JWT from the request.
It verifies the token’s signature and checks for expiration.
If valid, the request is allowed, and any user information in the token is trusted (e.g., user ID).
Access is Granted or Denied:
If the token is valid: The server allows access to the protected route and can use the user information inside the token to personalize the response.
If the token is missing, invalid, or expired: Access is denied (usually with a
401 Unauthorizedresponse).
Stateless Authentication Explained Simply
Traditional logins often use sessions. In session-based auth:
The server saves the user’s login status in memory or a database, and gives the client a small "session ID" cookie.
Every request checks the session ID; the server looks up the user info.
With JWT/stateless authentication:
The user’s data is stored in the JWT.
There is no need for the server to keep user login records—if a valid JWT is presented, that’s enough.
This is called "stateless" because the server doesn’t need to remember (store state about) the user between requests.
Benefits:
Makes scaling to many servers or microservices easy (no session syncing).
All necessary user info travels with each request in the token.
Tokens can have limited lifetimes (expiry).
Sending Token with Requests
The standard method is as an HTTP
Authorizationheader:Authorization: Bearer eyJhbGciOiJIUzI1NiIsInR5cCI6IkpXVCJ9...Some web apps use a cookie to store the JWT, especially when authentication is used for websites with browsers.
On every request that needs authentication, the client must send the JWT. If the token is forgotten or corrupted, authentication fails.
Protecting Routes Using Tokens
To secure API endpoints, you use middleware to check the validity of the JWT before serving the route.
A simple Express JWT verification example:
const jwt = require("jsonwebtoken");

function authenticateJWT(req, res, next) {
  // 1. Get token from Authorization header
  const authHeader = req.headers['authorization'];
  const token = authHeader && authHeader.split(' ')[1]; // Extracts just the token if header is "Bearer <token>"

  if (!token) {
    return res.status(401).json({ message: "Authentication token missing" });
  }

  // 2. Verify token signature and expiry
  jwt.verify(token, process.env.JWT_SECRET, (err, user) => {
    if (err) {
      return res.status(403).json({ message: "Token invalid or expired" });
    }

    req.user = user; // Attach user data to request for future handlers
    next();
  });
}

// Usage in a route
app.get('/protected', authenticateJWT, (req, res) => {
  res.json({ message: "This is a protected route.", user: req.user });
});
With this setup:
The middleware runs before the main route logic.
If authentication fails, the request stops, and an error is sent.
If the token is valid, user info is available for business logic.
When to Use JWT Authentication
APIs (RESTful or GraphQL) that need to be stateless and scalable
Single Page Applications (React, Angular, Vue) connecting to a backend
Mobile apps talking to a Node.js backend
Microservices that need a common authentication standard
Systems where sessions or server memory/state are hard to share or scale
JWT Authentication vs Traditional Sessions (A Brief Comparison)
| Feature | JWT (Stateless) | Session (Stateful) |
|---|---|---|
| Server stores user data | No (data in the token) | Yes (login session in DB/memory) |
| Scaling across servers | Easy, no sync needed | Must share session store |
| Revoking tokens | More complex | Easy (just delete session) |
| Expiry | Built into token (automatic) | Server sets expiration |
| Token size | Usually larger (carries data & signature) | Small session ID |
| Best for | APIs, mobile, microservices, SPAs | Classic web apps with server pages |
Key Points and Best Practices
Secret Keys: Always keep your token signing secret safe and private.
Never put passwords, secrets, or sensitive info in the payload.
Expiry: Set reasonable expiration on tokens; for long-running sessions or single logouts, consider refresh tokens.
Storage: Store JWTs securely on the client side, ideally in memory (for APIs) or HTTP-only cookies, not just localStorage.
Token Verification: Always verify token signature and expiry on every request to protected resources.
Summary
JWT authentication is a modern, stateless way to verify users in Node.js applications.
A JWT has three parts: a header, a payload with user info, and a signature to prevent tampering.
The server generates a JWT on login, sends it to the client, and trusts requests that include a valid, unmodified token.
All servers can independently verify user identity from the JWT alone—no session lookup required.
Middleware protects routes by validating and decoding tokens before handling requests.
JWTs help make authentication scalable, portable, and easier to manage—especially for modern JavaScript APIs and web apps.