

Handling File Uploads in Express with Multer
A Complete Guide to Understanding and Implementing File Uploads in Node.js
Introduction
File uploading is one of those features that appears in almost every real-world web application. Whether it is a user uploading a profile picture, a document management system accepting PDF files, or an e-commerce platform allowing sellers to upload product images, the ability to receive files from a client and process them on the server is a fundamental requirement.
In a standard Express application, handling file uploads is not as straightforward as handling regular form data or JSON payloads. Files are transmitted in a completely different format, and Express does not have the built-in capability to parse that format on its own. This is where Multer comes in.
This article will walk you through everything you need to understand and implement file uploads in Express using Multer. We will start from the foundational concept of why file uploads are different, work through the mechanics of how Multer processes them, and build up through single file uploads, multiple file uploads, storage configuration, and serving uploaded files back to clients. Each concept is explained fully so this article can serve as both a learning guide and a future reference.
Section 1 — Why File Uploads Need Middleware
To understand why middleware like Multer is necessary, we first need to understand how file data is transmitted from a browser to a server, and why that transmission format is fundamentally different from regular form submissions or API requests.
How Regular Form Data Is Sent
When a standard HTML form is submitted without any file inputs, the browser encodes the form data using a format called application/x-www-form-urlencoded. This is a simple, compact text format that looks something like this:
username=john&email=john@example.com&age=30
Express can parse this format natively using its built-in express.urlencoded() middleware, which makes all those values available on req.body. Similarly, when an API client sends a JSON payload, express.json() middleware parses it and populates req.body.
The Problem with Files
Files are a completely different matter. A file — whether it is a JPEG image, a PDF document, or a CSV spreadsheet — is binary data. Binary data cannot be reliably encoded as a simple URL-encoded string. Trying to squeeze binary file content into a flat key-value format like application/x-www-form-urlencoded would corrupt the data or produce an impossibly large, unreliable string.
Multipart Form Data
To solve this, the HTTP specification defines a different content type for forms that include file uploads: multipart/form-data. This is the encoding type you set on an HTML form when you want it to support file uploads:
<form action="/upload" method="POST" enctype="multipart/form-data">
  <input type="text" name="username" />
  <input type="file" name="avatar" />
  <button type="submit">Upload</button>
</form>
The enctype="multipart/form-data" attribute instructs the browser to encode the form submission differently. Instead of a flat key-value string, the browser packages the data into multiple parts — hence the name "multipart" — with each part separated by a unique boundary string. Each part has its own headers describing its content type and disposition.
A multipart request body looks roughly like this (simplified):
--boundary123
Content-Disposition: form-data; name="username"

john
--boundary123
Content-Disposition: form-data; name="avatar"; filename="profile.jpg"
Content-Type: image/jpeg

[binary JPEG data here]
--boundary123--
Each section between the boundary markers is a separate "part" of the request. Text fields are represented as plain text parts, and files are represented as binary parts with their original filename and MIME type preserved.
Why Express Cannot Handle This Alone
Express has no built-in parser for multipart/form-data. If you tried to access req.body in an Express route after receiving a multipart form submission without any middleware, you would find it is either empty or undefined. The raw binary stream of the multipart body arrives at Express, but nothing processes or interprets it.
This is precisely why middleware is required. A multipart parsing middleware reads the incoming request stream, identifies the boundary markers, separates the individual parts, extracts text fields into an accessible object, and handles the binary file data — either storing it to disk or keeping it in memory. Multer is the most widely used middleware for this job in the Express ecosystem.
Section 2 — What Multer Is
Multer is a Node.js middleware specifically designed for handling multipart/form-data, which as we have established is the encoding type used for file uploads. It is built on top of busboy, a highly efficient streaming parser for multipart form data. Multer intercepts incoming multipart requests, parses them, makes regular form fields available on req.body, and makes uploaded files available on req.file (for single file uploads) or req.files (for multiple file uploads).
Installing Multer
Multer is installed as a regular npm package:
npm install multer
Basic Multer Setup
At its simplest, you import Multer, create an instance by calling it as a function with a configuration object, and then use the resulting instance as middleware on your routes.
const express = require('express');
const multer = require('multer');

const app = express();

// Create a multer instance with basic configuration
const upload = multer({ dest: 'uploads/' });
The dest option tells Multer where to store uploaded files on the server's filesystem. The uploads/ directory is a common convention. When a file is uploaded, Multer will automatically save it to that directory. We will look at more sophisticated storage configuration in Section 5, but dest is the quickest way to get started.
What Multer Gives You
Once Multer has processed an incoming request, it enriches the req object with additional properties:
req.body— An object containing the text fields from the multipart form (just like a regular form submission)req.file— An object containing information about a single uploaded file (when using single file upload)req.files— An array of objects containing information about multiple uploaded files (when using multiple file upload)
Each file object that Multer attaches to req.file or req.files contains the following key properties:
{
  fieldname: 'avatar',           // The name attribute of the file input field
  originalname: 'profile.jpg',   // The original filename on the user's computer
  encoding: '7bit',              // The encoding type of the file
  mimetype: 'image/jpeg',        // The MIME type of the file
  destination: 'uploads/',       // The folder where the file was saved
  filename: 'a3f8b2c1d4e5f6a7', // The filename Multer gave the file on disk (no extension by default)
  path: 'uploads/a3f8b2c1d4e5f6a7', // The full path to the saved file
  size: 204800                   // The size of the file in bytes
}
This rich set of metadata gives your route handlers everything they need to work with the uploaded file — store a database record of it, validate its type, process it further, or serve it back to clients.
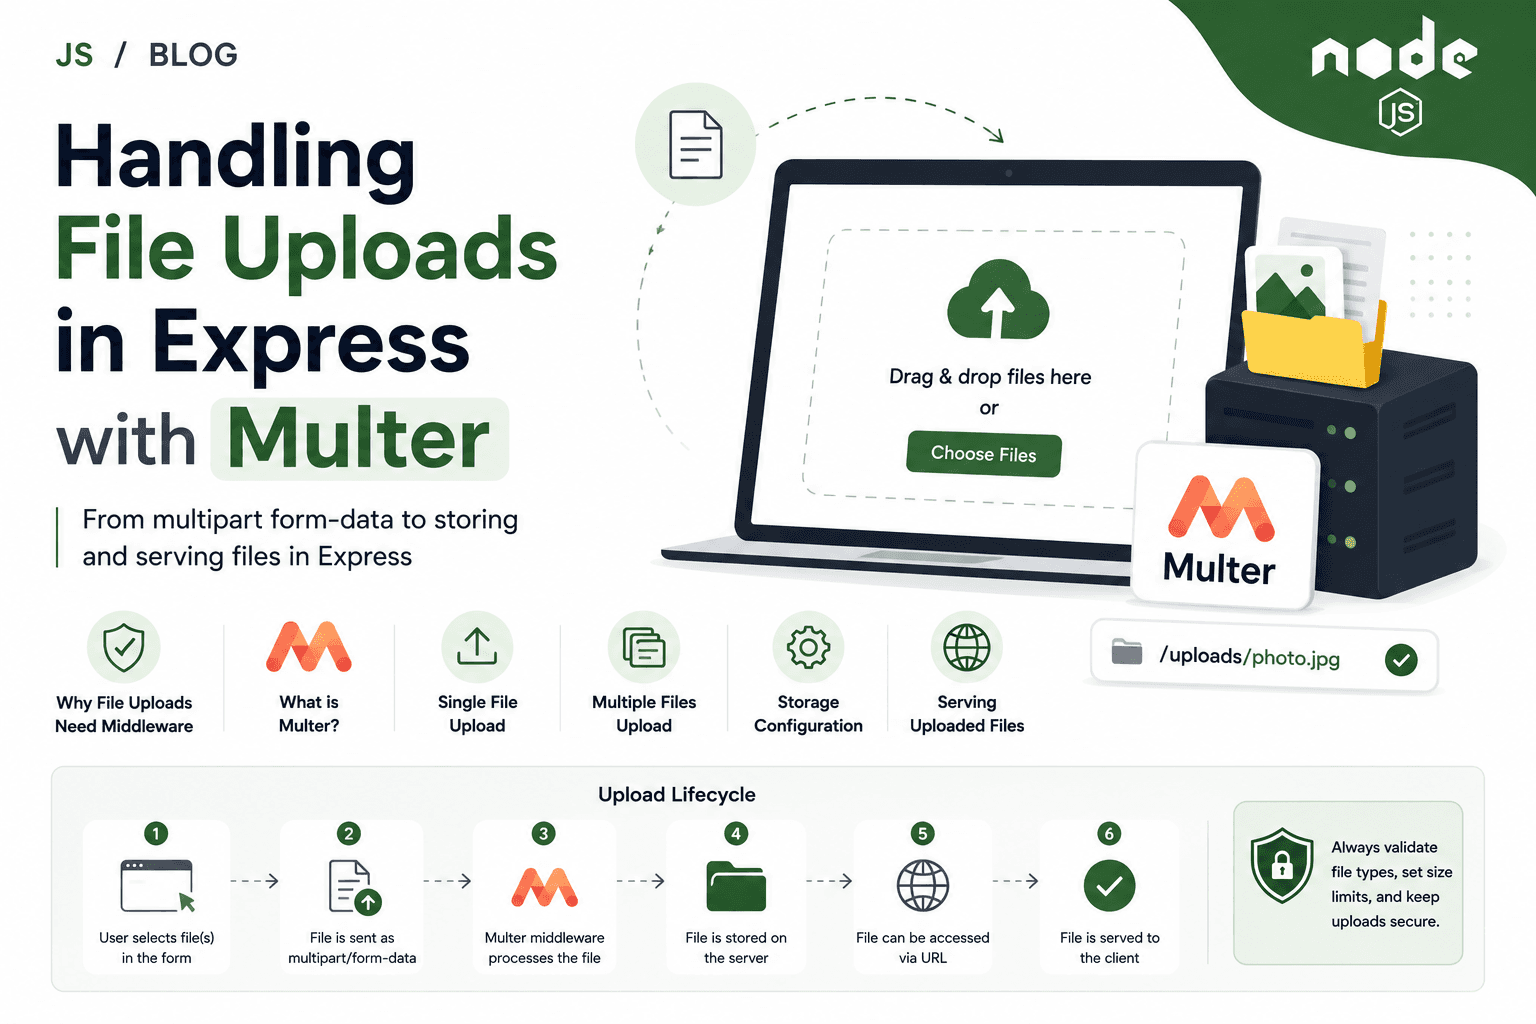
Section 3 — The Upload Lifecycle
Before diving into code examples, it is valuable to have a clear mental model of what happens from the moment a user selects a file and clicks submit to the moment your route handler runs. Understanding this lifecycle will help you reason about what is happening at each stage and where things can go wrong.
Stage 1: The Client Submits the Form
The user selects a file using a file input and submits the form. The browser packages the form data — both text fields and the file binary data — into a multipart/form-data request and sends it to the server as an HTTP POST request. The request includes a Content-Type header that specifies the boundary string used to separate the parts.
Stage 2: Express Receives the Request
The Express server receives the incoming HTTP request. At this point, the request body is a raw binary stream. Express passes the request through its middleware stack.
Stage 3: Multer Intercepts and Parses
When the request reaches a route that has Multer configured as middleware, Multer takes over. It reads the Content-Type header to confirm this is a multipart request, identifies the boundary string, and begins streaming through the request body. For each part it encounters, it determines whether it is a regular text field or a file upload. Text fields are parsed and added to req.body. File parts are streamed to the configured storage destination (disk or memory).
Stage 4: Multer Enriches the Request Object
Once parsing is complete, Multer has populated req.body with text fields and req.file or req.files with file metadata. Control is then passed to the next middleware or route handler via next().
Stage 5: Your Route Handler Runs
Your route handler function now has full access to both the form fields and the uploaded file information. You can use this information to save records to a database, respond to the client, trigger further processing, etc.
Client submits multipart form
          |
          v
HTTP POST request with binary body reaches Express
          |
          v
Multer middleware parses the multipart body
          |
          v
Text fields → req.body
Files → saved to disk → metadata → req.file / req.files
          |
          v
Route handler executes with full req.body and req.file
          |
          v
Server sends response to client
Section 4 — Handling a Single File Upload
Let us now look at a complete, working implementation of a single file upload. This is the most common case — a form with one file input, such as a profile picture uploader.
The HTML Form
On the client side, the form must use the correct enctype attribute and have a file input with a name attribute. The name attribute is important — it is the field name that Multer will look for:
<!DOCTYPE html>
<html>
<head>
  <title>Upload Profile Picture</title>
</head>
<body>
  <h1>Upload Your Profile Picture</h1>
  <form action="/upload/profile" method="POST" enctype="multipart/form-data">
    <label for="username">Username:</label>
    <input type="text" id="username" name="username" />

    <label for="avatar">Profile Picture:</label>
    <input type="file" id="avatar" name="avatar" />

    <button type="submit">Upload</button>
  </form>
</body>
</html>
The Express Server
const express = require('express');
const multer = require('multer');
const path = require('path');

const app = express();

// Configure multer with a destination folder
const upload = multer({ dest: 'uploads/' });

// Serve the HTML form
app.get('/', (req, res) => {
  res.sendFile(path.join(__dirname, 'index.html'));
});

// Handle single file upload
// upload.single('avatar') tells Multer to expect a single file
// from a form field named 'avatar'
app.post('/upload/profile', upload.single('avatar'), (req, res) => {
  // req.body contains the text fields from the form
  const username = req.body.username;

  // req.file contains the uploaded file's metadata
  const file = req.file;

  // If no file was uploaded, req.file will be undefined
  if (!file) {
    return res.status(400).json({ error: 'No file uploaded' });
  }

  console.log('Text field - username:', username);
  console.log('Uploaded file details:', file);

  res.json({
    message: 'File uploaded successfully',
    username: username,
    file: {
      originalName: file.originalname,
      storedAs: file.filename,
      size: file.size,
      mimeType: file.mimetype
    }
  });
});

app.listen(3000, () => {
  console.log('Server running on http://localhost:3000');
});
Examining the Key Line
The critical line to understand here is:
app.post('/upload/profile', upload.single('avatar'), (req, res) => { ... });
upload.single('avatar') is a middleware factory call. It tells Multer to look for a single file in the incoming request under the field name 'avatar' — exactly matching the name="avatar" attribute on the HTML file input. If found, Multer processes it and attaches the result to req.file. The string argument must match the name attribute of your file input, or Multer will not find the file.
What Multer Does With the File (Using dest)
When you configure Multer with just a dest option, it saves the file to that directory with a randomly generated filename and no file extension. For example, your uploaded profile.jpg might be stored as uploads/7f3a8b2c1d4e5f6a. This is intentional — it avoids filename collisions and prevents users from overwriting each other's files. The original filename is preserved in file.originalname so you can reference it, but the file on disk uses the generated name.
This default behaviour is suitable for getting started, but in most real applications you will want control over how files are named and organised. We will cover that in Section 5.
Section 5 — Handling Multiple File Uploads
There are two main scenarios for multiple file uploads: accepting multiple files from a single file input that allows multiple selection, and accepting files from multiple different file inputs, each with a different field name.
Scenario A: Multiple Files from a Single Field
If you want to allow users to select several files at once from one input, you add the multiple attribute to the file input:
<form action="/upload/gallery" method="POST" enctype="multipart/form-data">
  <label>Upload Gallery Images:</label>
  <input type="file" name="photos" multiple />
  <button type="submit">Upload All</button>
</form>
On the server, you use upload.array() instead of upload.single(). The first argument is the field name, and the optional second argument is the maximum number of files allowed:
// upload.array('photos', 10) expects multiple files under the field name 'photos'
// and allows a maximum of 10 files
app.post('/upload/gallery', upload.array('photos', 10), (req, res) => {
  // req.files is an array of file objects when using upload.array()
  const files = req.files;

  if (!files || files.length === 0) {
    return res.status(400).json({ error: 'No files uploaded' });
  }

  const fileDetails = files.map(file => ({
    originalName: file.originalname,
    storedAs: file.filename,
    size: file.size,
    mimeType: file.mimetype
  }));

  res.json({
    message: `${files.length} files uploaded successfully`,
    files: fileDetails
  });
});
With upload.array(), req.files is an array of file objects, one for each uploaded file. You can iterate over this array to process each file.
Scenario B: Files from Multiple Different Fields
Sometimes a form has multiple distinct file inputs, each serving a different purpose — for example, a product upload form with separate inputs for a main image and additional gallery images:
<form action="/upload/product" method="POST" enctype="multipart/form-data">
  <label>Product Name:</label>
  <input type="text" name="productName" />

  <label>Main Product Image:</label>
  <input type="file" name="mainImage" />

  <label>Additional Gallery Images:</label>
  <input type="file" name="galleryImages" multiple />

  <button type="submit">Submit Product</button>
</form>
For this case, you use upload.fields(), passing an array of objects that describe each expected file field and its maximum count:
const uploadFields = upload.fields([
  { name: 'mainImage', maxCount: 1 },
  { name: 'galleryImages', maxCount: 5 }
]);

app.post('/upload/product', uploadFields, (req, res) => {
  // When using upload.fields(), req.files is an OBJECT
  // where each key is a field name and the value is an array of file objects
  const mainImage = req.files['mainImage'];
  const galleryImages = req.files['galleryImages'];

  if (!mainImage) {
    return res.status(400).json({ error: 'Main image is required' });
  }

  const productName = req.body.productName;

  res.json({
    message: 'Product uploaded successfully',
    productName: productName,
    mainImage: {
      originalName: mainImage[0].originalname,
      storedAs: mainImage[0].filename
    },
    galleryImages: galleryImages
      ? galleryImages.map(f => ({ originalName: f.originalname, storedAs: f.filename }))
      : []
  });
});
Notice that with upload.fields(), req.files is an object (not an array). Each key in the object is a field name, and each value is an array of file objects for that field. Even when maxCount is 1 (like mainImage), the value is still an array — hence mainImage[0] to get the first (and only) file.
Summary of Upload Methods
| Method | Use Case | Result on req |
|---|---|---|
upload.single('fieldname') |
One file from one input | req.file — a single file object |
upload.array('fieldname', max) |
Multiple files from one input | req.files — array of file objects |
upload.fields([...]) |
Files from multiple different inputs | req.files — object keyed by field name |
upload.none() |
Multipart form with no files (text fields only) | req.body only |
Section 6 — Storage Configuration
So far, all our examples have used the simple dest option to tell Multer where to store files. While this is fine for quick prototyping, real applications need more control — specifically, control over what files are named on disk and which subdirectory they are stored in. Multer provides this through the diskStorage engine.
Why dest Is Limiting
When you use dest: 'uploads/', Multer generates a random filename with no extension for every uploaded file. This creates two problems in practice:
No file extension — operating systems and browsers use file extensions to determine how to handle a file. A stored file with no extension cannot be directly served back to a client in a meaningful way without additional processing.
No organisation — all files land in the same flat directory, which becomes unmanageable as the number of uploads grows.
Configuring diskStorage
multer.diskStorage() accepts a configuration object with two functions: destination and filename. Both functions receive the incoming request (req), the file object as parsed so far (file), and a callback (cb) that you call with your chosen value.
const multer = require('multer');
const path = require('path');
const fs = require('fs');

const storage = multer.diskStorage({
  // destination determines which folder the file is saved in
  destination: function (req, file, cb) {
    const uploadDir = 'uploads/';

    // Ensure the directory exists before trying to save to it
    if (!fs.existsSync(uploadDir)) {
      fs.mkdirSync(uploadDir, { recursive: true });
    }

    // Call cb with null as the first argument (no error) and the directory path
    cb(null, uploadDir);
  },

  // filename determines what the file will be named on disk
  filename: function (req, file, cb) {
    // Extract the original file extension (e.g., '.jpg', '.pdf')
    const extension = path.extname(file.originalname);

    // Create a unique filename using the current timestamp and a random number
    // This prevents collisions while keeping the extension intact
    const uniqueSuffix = Date.now() + '-' + Math.round(Math.random() * 1e9);

    // The final filename: e.g., 'avatar-1699453212345-123456789.jpg'
    const finalFilename = file.fieldname + '-' + uniqueSuffix + extension;

    cb(null, finalFilename);
  }
});

// Create the multer instance using the custom storage engine
const upload = multer({ storage: storage });
The two callback functions are called by Multer as it processes the upload, giving you the opportunity to dynamically determine the storage location and filename. The first argument to cb is always an error value — pass null if there is no error, or pass an Error object to abort the upload with an error.
Using the Custom Storage Configuration
Once you have created the upload instance with the custom storage configuration, you use it exactly the same way as before:
app.post('/upload/profile', upload.single('avatar'), (req, res) => {
  const file = req.file;

  if (!file) {
    return res.status(400).json({ error: 'No file uploaded' });
  }

  // Now file.filename will be something like 'avatar-1699453212345-123456789.jpg'
  // and file.path will be 'uploads/avatar-1699453212345-123456789.jpg'

  res.json({
    message: 'Profile picture uploaded',
    filename: file.filename,
    path: file.path
  });
});
Adding File Type Validation with fileFilter
In a production application, you almost certainly want to restrict which types of files users can upload. Multer provides a fileFilter option for this purpose. It is a function that receives the request, the file, and a callback, and you call the callback with either true (accept the file) or false (reject the file):
const imageFilter = function (req, file, cb) {
  // Accept only image files based on their MIME type
  const allowedMimeTypes = ['image/jpeg', 'image/png', 'image/gif', 'image/webp'];

  if (allowedMimeTypes.includes(file.mimetype)) {
    // Accept the file
    cb(null, true);
  } else {
    // Reject the file with an error
    cb(new Error('Only image files are allowed (JPEG, PNG, GIF, WebP)'), false);
  }
};

const upload = multer({
  storage: storage,
  fileFilter: imageFilter,
  limits: {
    fileSize: 5 * 1024 * 1024 // Limit file size to 5 megabytes
  }
});
The limits option allows you to set constraints on the upload — fileSize is the maximum allowed file size in bytes. 5 * 1024 * 1024 evaluates to 5,242,880, which is 5 megabytes. Multer will automatically reject any file that exceeds this size.
Handling Multer Errors in Routes
When Multer rejects a file due to a fileFilter rejection or a size limit violation, it passes an error to Express. You should handle these errors explicitly in your routes or with an error-handling middleware:
app.post('/upload/profile', (req, res, next) => {
  upload.single('avatar')(req, res, function (err) {
    if (err instanceof multer.MulterError) {
      // A Multer-specific error occurred (e.g., file too large)
      if (err.code === 'LIMIT_FILE_SIZE') {
        return res.status(400).json({ error: 'File is too large. Maximum size is 5MB.' });
      }
      return res.status(400).json({ error: err.message });
    } else if (err) {
      // A custom error from fileFilter
      return res.status(400).json({ error: err.message });
    }

    // No errors — proceed with the upload
    if (!req.file) {
      return res.status(400).json({ error: 'No file uploaded' });
    }

    res.json({
      message: 'Profile picture uploaded successfully',
      filename: req.file.filename
    });
  });
});
This pattern — calling the Multer middleware manually and passing a callback — gives you fine-grained control over error handling at the route level.
Section 7 — Serving Uploaded Files
Uploading files to the server is only half the story. In most applications, you also need to make those files accessible to clients — so that an uploaded profile picture can be displayed in the browser, or an uploaded document can be downloaded.
Using express.static() to Serve the Uploads Directory
The simplest way to make uploaded files accessible is to use Express's built-in express.static() middleware to serve the directory where Multer stores files. This tells Express to treat a given directory as a source of static files that can be accessed directly via URL:
const express = require('express');
const path = require('path');

const app = express();

// Serve files from the 'uploads' directory under the '/uploads' URL path
app.use('/uploads', express.static(path.join(__dirname, 'uploads')));
With this configuration in place, a file stored at uploads/avatar-1699453212345-123456789.jpg on the server's filesystem would be accessible at:
http://localhost:3000/uploads/avatar-1699453212345-123456789.jpg
A Complete Upload and Serve Example
Here is a complete working example that ties together uploading, storing metadata, and serving the file:
const express = require('express');
const multer = require('multer');
const path = require('path');

const app = express();
app.use(express.json());

// Serve static files from the uploads directory
app.use('/uploads', express.static(path.join(__dirname, 'uploads')));

// Configure disk storage
const storage = multer.diskStorage({
  destination: (req, file, cb) => cb(null, 'uploads/'),
  filename: (req, file, cb) => {
    const ext = path.extname(file.originalname);
    const uniqueName = `\({file.fieldname}-\){Date.now()}${ext}`;
    cb(null, uniqueName);
  }
});

const upload = multer({
  storage,
  fileFilter: (req, file, cb) => {
    const allowed = ['image/jpeg', 'image/png'];
    allowed.includes(file.mimetype) ? cb(null, true) : cb(new Error('Images only'));
  },
  limits: { fileSize: 2 * 1024 * 1024 } // 2MB limit
});

// Upload endpoint
app.post('/upload/avatar', upload.single('avatar'), (req, res) => {
  if (!req.file) {
    return res.status(400).json({ error: 'No file received' });
  }

  // Construct the public URL for the uploaded file
  const fileUrl = `\({req.protocol}://\){req.get('host')}/uploads/${req.file.filename}`;

  res.status(201).json({
    message: 'Avatar uploaded successfully',
    url: fileUrl,
    filename: req.file.filename,
    size: req.file.size
  });
});

// Example endpoint: retrieve a file URL by filename
app.get('/files/:filename', (req, res) => {
  const filename = req.params.filename;
  const filePath = path.join(__dirname, 'uploads', filename);

  // Send the file — Express will set appropriate Content-Type headers
  res.sendFile(filePath, (err) => {
    if (err) {
      res.status(404).json({ error: 'File not found' });
    }
  });
});

app.listen(3000, () => {
  console.log('Server running on http://localhost:3000');
});
Understanding the File URL Construction
In the upload handler, notice how we construct a public URL for the file:
const fileUrl = `\({req.protocol}://\){req.get('host')}/uploads/${req.file.filename}`;
req.protocolgives ushttporhttpsreq.get('host')gives us the host and port (e.g.,localhost:3000)/uploads/is the URL prefix we configured inexpress.static()req.file.filenameis the name of the file as stored on disk by Multer
This results in a complete, accessible URL like http://localhost:3000/uploads/avatar-1699453212345.jpg that the client can use directly in an <img> tag or as a download link.
Section 8 — Pulling It All Together: A Structured Project Example
To consolidate everything covered in this article, here is how a well-structured Express project might organise its file upload functionality:
project/
├── uploads/              ← Multer stores files here (gitignored)
├── routes/
│   └── uploadRoutes.js   ← Route definitions
├── middleware/
│   └── upload.js         ← Multer configuration (reusable)
├── index.js              ← Express app entry point
└── package.json
middleware/upload.js — Centralised, reusable Multer configuration:
const multer = require('multer');
const path = require('path');

const storage = multer.diskStorage({
  destination: (req, file, cb) => {
    cb(null, 'uploads/');
  },
  filename: (req, file, cb) => {
    const ext = path.extname(file.originalname);
    const uniqueName = `\({file.fieldname}-\){Date.now()}-\({Math.round(Math.random() * 1e6)}\){ext}`;
    cb(null, uniqueName);
  }
});

const fileFilter = (req, file, cb) => {
  const allowedTypes = ['image/jpeg', 'image/png', 'image/webp'];
  if (allowedTypes.includes(file.mimetype)) {
    cb(null, true);
  } else {
    cb(new Error('Only JPEG, PNG, and WebP images are accepted'), false);
  }
};

const upload = multer({
  storage,
  fileFilter,
  limits: { fileSize: 5 * 1024 * 1024 }
});

module.exports = upload;
routes/uploadRoutes.js — Clean, focused route handlers:
const express = require('express');
const router = express.Router();
const upload = require('../middleware/upload');

// Single file upload
router.post('/avatar', upload.single('avatar'), (req, res) => {
  if (!req.file) return res.status(400).json({ error: 'No file provided' });

  const url = `\({req.protocol}://\){req.get('host')}/uploads/${req.file.filename}`;
  res.status(201).json({ message: 'Avatar uploaded', url });
});

// Multiple files upload
router.post('/gallery', upload.array('photos', 8), (req, res) => {
  if (!req.files || req.files.length === 0) {
    return res.status(400).json({ error: 'No files provided' });
  }

  const urls = req.files.map(f => ({
    originalName: f.originalname,
    url: `\({req.protocol}://\){req.get('host')}/uploads/${f.filename}`
  }));

  res.status(201).json({ message: `${req.files.length} photos uploaded`, files: urls });
});

module.exports = router;
index.js — Clean application entry point:
const express = require('express');
const path = require('path');
const uploadRoutes = require('./routes/uploadRoutes');

const app = express();

app.use(express.json());
app.use('/uploads', express.static(path.join(__dirname, 'uploads')));
app.use('/upload', uploadRoutes);

app.listen(3000, () => {
  console.log('Server ready at http://localhost:3000');
});
This structure separates concerns clearly: Multer configuration lives in one place, routes live in their own module, and the main application file stays clean. As the application grows, you can add new upload configurations without touching the core app setup.
Summary and Key Takeaways
Let us close with a consolidated set of key points that serve as a reference for everything covered in this article.
Why middleware is necessary — Standard form submissions use application/x-www-form-urlencoded, which Express can parse natively. File uploads use multipart/form-data, which encodes binary file data alongside text fields using boundary separators. Express has no built-in parser for this format, so dedicated middleware is required.
What Multer is — Multer is a Node.js middleware built on top of the busboy streaming parser. It intercepts multipart form requests, extracts text fields into req.body, and makes uploaded file metadata available on req.file (single) or req.files (multiple).
Single file uploads use upload.single('fieldname'), where the string argument must match the name attribute of the file input. The result is available on req.file.
Multiple files from one field use upload.array('fieldname', maxCount). The result is an array on req.files.
Files from multiple different fields use upload.fields([{ name, maxCount }, ...]). The result is an object on req.files keyed by field name.
Storage configuration — The dest shorthand is convenient but saves files without extensions. multer.diskStorage() with custom destination and filename functions gives full control over how and where files are stored.
File validation — The fileFilter option controls which files are accepted based on their MIME type or other properties. The limits.fileSize option enforces a maximum file size. Multer errors should be caught and handled explicitly for a good user experience.
Serving files — express.static() is the simplest way to make an uploads directory publicly accessible over HTTP. The file URL can be constructed from the protocol, host, static path prefix, and the stored filename.